
Quickstart
Unifi released the Zone Based Firewall a while back and at first it was a little confusing. I have gotten much better with it since its release and wanted to give some tips and tricks as well as some information how to use it.
What is a Zone?
A Zone is basically a collection of networks that allows you to apply a firewall policy to the collection or individual addresses to block or allow certain network traffic.
How do I add a Firewall Rule to a Zone?
This is fairly simple, lets start with a basic firewall rule.
- Open the Unifi Console
- Click the Gear Icon on the Left near the bottom
- Click Policy Engine
- Scroll Down to the bottom and Click Create Policy
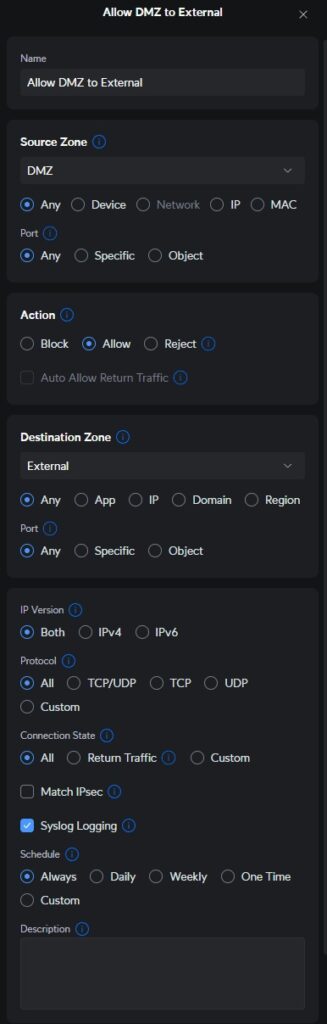
- You will need the following information
- Name: What do you want to call the policy?
- I normally start the name with what it does and then give a descriptive name for what it applies to. “Allow Internal to Guest for” example.
- Source Zone:
- Select the Zone the device you wish to create the rule for, is located.
- You can then select:
- Any: Applies to Any device.
- Device: Applies to a specific Device that is under Clients.
- Network: Applies to entire defined network.
- IP: Applies to an Single IP, Range of IPs, Subnet or you can use a Network Object created under Profiles.
- Port: This is to define the source port, since many of these are random there are options to work around that.
- Any: All Ports
- Specific: If you know the source port and want to restrict it, add that Port here.
- Object: You can also apply a defined Network Object that is set for a specific Port Range.
- Action:
- Block: This is the default and will actively block the connection making the source think that the destination isn’t listening on that Port.
- Allow: This will allow access to a destination Port.
- Reject: This blocks and tells the source that the device blocked the connection.
- Destination Zone: Select the Zone that the destination of where the policy is applied is located. You would choose External for the Internet.
- You can then select:
- Any: Applies to Any Device
- App: If you want to block access to specific App.
- IP: Applies to a Single IP, IP Range or Subnet
- Domain: If you’d like to block a specific domain name.
- Region: If you’d like to block access to a specific country.
- Port: You can select the following options.
- Any: All Ports
- Specific: A single Port, a Range or a combination of both.
- Object: You can also apply a defined Network Object that is set for a specific Port Range.
- Match Opposite Port: unchecked
- This basically takes your rule and flips it. I don’t see much use in defining a block and then reversing it so it blocks everything else.
- IP Version:
- Lets you select IPv4, IPv6 or Both in most cases Both is the best option.
- Protocol:
- All: Applies to all Protocols that could be using the Port.
- TCP/UDP: Applies to both TCP and UDP
- TCP: Applies to TCP only
- UDP Applies to UDP only
- Custom: Allows you to select a known protocol such as ICMP, you may have to select the IP version to select it however.
- Match Opposite: unchecked
- This basically will apply to the opposite of how the policy is defined. I haven’t seen much use for this option.
- Connection State:
- All: This is the default and will apply to all connection states.
- Return Traffic: Will only apply to return traffic.
- Custom:
- Can apply to the following connection states.
- New
- Invalid
- Established
- Related
- Can apply to the following connection states.
- Match IPSec: Allows you to have the policy match on encrypted IPSEC traffic.
- Syslog Logging: You can add this to Syslog if you have the need to view when the policy is matched.
- Schedule: You can schedule when the policy is enforced.
- Always: This is the default
- Daily: You can set the time when it is enforced and when its allowed.
- Weekly: You can set the days its allowed and the hours its applied. All day is an option as well.
- One Time: Set a specific day and time tha the policy is applied.
- Name: What do you want to call the policy?
- Click Add Policy
In order to validate that the policy is working as expected you can see it working in flows by kicking off something that makes the call out to a specific port and watching flows to see if it is being blocked or allowed based on your configuration. You may need to move the policy ahead of another one so that it matches first. Firewall policies go down the list so the less restrictive policies should be above the more restrictive policies. So lets say you want to block a zone or IP range create a block to do this blocking that zone from getting to anything. This should be at the bottom of the policy list. Now you want to allow a client to get to any website, you would create a rule allowing DNS, HTTP and HTTPs for that machine IP and put that rule ahead of the block policy. The order matters, the first match is what will be used.
Network Objects Profiles
These are a great way to streamline the rules, especially for things that you will reuse for many devices.
- Create a new Network Objects Profile by doing the following.
- Open the Unifi Console
- Click the Gear in the lower left
- Click Profiles
- Click Network Objects
- Click Create New
- Give the Profile a unique descriptive name.
- The following objects can be defined.
- Port: You can add a Port, and a Port Range and can add multiple into this field. Where this comes in handy are for services that require multiple ports such as SMB, Internet Access, or maybe even a standard allowed or denied port list that all clients will need.
- IPv4 Address/Subnet: This is where you would put either a single IP a Subnet or a Range of IPs that you would want to create a policy around. You can add multiple addresses into this as well. This is only for IPv4.
- IPv6 Address/Subnet: This is where you would put either a single IP a Subnet or a Range of IPs that you would want to create a policy around. You can add multiple addresses into this as well. This is only for IPv6.
Region Blocking
Do you want to stop countries from trying to hack into your network. Rogue states that are trying to harvest information or get a backdoor into your network. This is where Region Blocking comes into play.
- Open the Unifi Console
- Click the Gear Icon in the lower left
- Click CyberSecure
- Region Blocking: checked
- Block: Any region you select will be blocked.
- Allow: Only the selected regions will be allowed, all other will be blocked.
- Both Directions: Applies if you try to go to a defined region or if a region is trying to directly access your system.
- Outgoing: Applies if you are trying to go to a defined region.
- Incoming: Applies if someone in a defined region is trying to access your system.
- Select Country or Territory:
- Allows you to pick the locations that the Region Blocking applies to.
Honeypot
- Open the Unifi Console
- Click the Gear Icon in the lower left
- Click CyberSecure
- Under Honeypot click Create New
- Select the network you wish to create a Honeypot for
- Assign an unused IP address to the Honeypot
- Click Create
- These are used so that you can see if a compromised machine is scanning your network. It opens commonly used ports to this IP with no services running in the background so that it can see if a device is trying to hack your network.
Detections
- Open the Unifi Console
- Click the Gear Icon in the lower left
- Click CyberSecure
- Detection Mode: You can either Notify, or Notify and Block. You can select which of these you wish to monitor for and select which detections in the category that are important to you.
- Botnets and Threat Intelligence
- Virus, Malware and Spyware
- Hacking and Exploits
- Peer to Peer and Dark Web
- Attacks and Reconnaissance
- Protocol Vulnerabilities
- Detection Exclusions: You can allow certain connections even if you have blocking enabled.
- Click Create New
- Select the direction you wish to allow.
- Both
- Incoming
- Outgoing
- Type:
- IP Address
- Network
- Subnet
- Apply Changes for the allow to be applied.
Intrusions
- Open the Unifi Console
- Click the Gear Icon in the lower left
- Click CyberSecure
- Intrusion Prevention: On
- This will enable deep packet inspection to see what calls a device is trying to do that could cause your network to become compromised.
While there are other things you can do, I have found that these are less intrusive while still being effective. You can do things such as content filtering, encrypted DoH DNS, and simple app blocking if you want your network to be free of social media or spotify. I feel that since bandwidth is not much of a concern anymore this just causes issues but if you want to do those things feel free to try them out.